Introduction
I have added a new example to my open source C++ Vulkan examples that demonstrates the use of input attachments and subpasses within a single render pass.
Input attachments are image views that can be used for pixel local load operations inside a fragment shader. This basically means that framebuffer attachments written in one subpass can be read from at the exact same pixel (that they have been written) in subsequent subpasses.
Although the limitation of not being able to sample outside of the fixed pixel coordinates rules them out for advanced post processing stuff where you need to sample neighboring pixels, there are still several other applications like G-Buffer composition for a deferred renderer, debug visualizations and even order independent transparency.
The traditional way, without using input attachments would involve multiple passes, where the second pass would consume the attachment image views as e.g. combined images.
On tile-based-renderer, which is pretty much anything on mobile, using input attachments is faster than the traditional multi-pass approach as pixel reads are fetched from tile memory instead of mainframebuffer, so if you target the mobile market it’s always a good idea to use input attachments instead of multiple passes when possible.
Framebuffer setup
In addition to writing to the swap chain (color) image, we also want to fill the images for the input attachments so we add them to the list of views passed as attachments for framebuffer creation:
void setupFrameBuffer()
{
    VkImageView views[3];

    VkFramebufferCreateInfo frameBufferCI{};
    ...
    frameBufferCI.attachmentCount = 3;
    frameBufferCI.pAttachments = views;
    ...

    for (uint32_t i = 0; i < frameBuffers.size(); i++) {
        views[0] = swapChain.buffers[i].view;
        views[1] = attachments[i].color.view;
        views[2] = attachments[i].depth.view;
        vkCreateFramebuffer(device, &frameBufferCI, nullptr, &frameBuffers[i]);
    }
}
Subpass setup
In Vulkan a render pass consists of an arbitrary number of subpasses. Subpasses reference framebuffer attachments for reads (and writes), know how they related to other subpasses and can be used to add implicit image layout transitions, so no explicit image memory barriers are required.
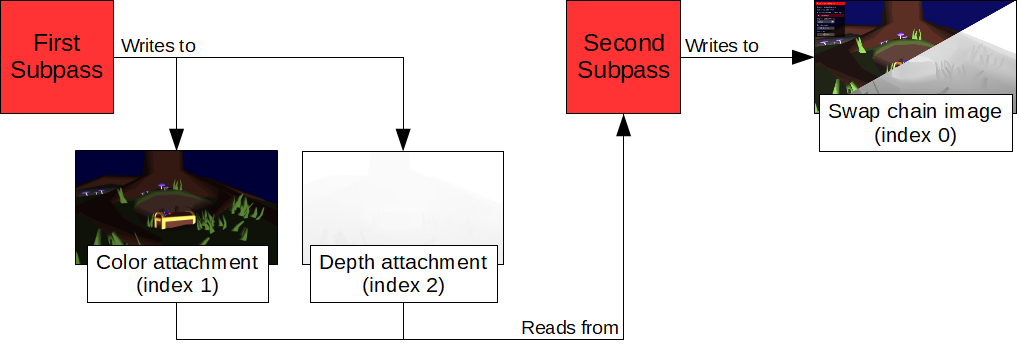
For this example we will be doing two subpasses in our render pass. The first subpass will fill a color and a depth image, the second subpass will read from either one (depending on a user selection) and applies filters to them and writes them to the swap chain color image.
Remember that the framebuffers attachment have been setup as:
attachment[0] = swap chain color image
attachment[1] = (input attachment) color image
attachment[2] = (input attachment) depth image
These indexes will be referred to in the subpass setup.
The first subpass will write to the images:
VkAttachmentReference colorReference{};
colorReference.attachment = 1;
colorReference.layout = VK_IMAGE_LAYOUT_COLOR_ATTACHMENT_OPTIMAL;

VkAttachmentReference depthReference{};
depthReference.attachment = 2;
depthReference.layout = VK_IMAGE_LAYOUT_DEPTH_STENCIL_ATTACHMENT_OPTIMAL;

subpassDescriptions[0].pipelineBindPoint = VK_PIPELINE_BIND_POINT_GRAPHICS;
subpassDescriptions[0].colorAttachmentCount = 1;
subpassDescriptions[0].pColorAttachments = &colorReference;
subpassDescriptions[0].pDepthStencilAttachment = &depthReference;
We pass the custom color image as the only color attachment (attachment index 1) and the custom depth image (attachment index 2) as the only depth stencil attachment. With this setup, the fragment shader used in this setup can write to the color attachment at location 0, writing to the depth attachment explicitly is not required.
The second subpass will write to the swap chain color image (attachment index 0):
VkAttachmentReference colorReference{};
colorReference.attachment = 0;
colorReference.layout = VK_IMAGE_LAYOUT_COLOR_ATTACHMENT_OPTIMAL;

subpassDescriptions[1].pipelineBindPoint = VK_PIPELINE_BIND_POINT_GRAPHICS;
subpassDescriptions[1].colorAttachmentCount = 1;
subpassDescriptions[1].pColorAttachments = &colorReference;
And use the previous color and depth images as input attachments:
VkAttachmentReference inputReferences[2]{};
inputReferences[0].attachment = 1;
inputReferences[0].layout = VK_IMAGE_LAYOUT_SHADER_READ_ONLY_OPTIMAL;

inputReferences[1].attachment = 2;
inputReferences[1].layout = VK_IMAGE_LAYOUT_SHADER_READ_ONLY_OPTIMAL;

subpassDescriptions[1].inputAttachmentCount = 2;
subpassDescriptions[1].pInputAttachments = inputReferences;
Descriptors
For the second subpass, that reads from the color and depth images we need to define descriptors that reference these. This is done with the VK_DESCRIPTOR_TYPE_INPUT_ATTACHMENT descriptor type, the rest is just your standard setup similar to e.g. using combined image samplers.
Descriptor set layout:
std::array<VkDescriptorSetLayoutBinding, 3> setLayoutBindings{};
setLayoutBindings[0].binding = 0;
setLayoutBindings[0].descriptorCount = 1;
setLayoutBindings[0].descriptorType = VK_DESCRIPTOR_TYPE_INPUT_ATTACHMENT;
setLayoutBindings[0].stageFlags = VK_SHADER_STAGE_FRAGMENT_BIT;

setLayoutBindings[1].binding = 1;
setLayoutBindings[1].descriptorCount = 1;
setLayoutBindings[1].descriptorType = VK_DESCRIPTOR_TYPE_INPUT_ATTACHMENT;
setLayoutBindings[1].stageFlags = VK_SHADER_STAGE_FRAGMENT_BIT;
...
Image descriptors:
std::array<VkDescriptorImageInfo, 2> descriptors{};
descriptors[0].imageLayout = VK_IMAGE_LAYOUT_SHADER_READ_ONLY_OPTIMAL;
descriptors[0].imageView = attachments[i].color.view;
descriptors[0].sampler = VK_NULL_HANDLE;

descriptors[1].imageLayout = VK_IMAGE_LAYOUT_SHADER_READ_ONLY_OPTIMAL;
descriptors[1].imageView = attachments[i].depth.view;
descriptors[1].sampler = VK_NULL_HANDLE;
Note that we don’t pass a sampler, as input attachments are just pixel local loads and as such aren’t sampled in any way. By reading them you read that exact same value that was previously written at that position.
Descriptor sets:
std::array<VkWriteDescriptorSet, 3> writeDescriptorSets{};
writeDescriptorSets[0].dstSet = descriptorSets.attachmentRead[i];
writeDescriptorSets[0].descriptorType = VK_DESCRIPTOR_TYPE_INPUT_ATTACHMENT;
writeDescriptorSets[0].descriptorCount = 1;
writeDescriptorSets[0].dstBinding = 0;
writeDescriptorSets[0].pImageInfo = &descriptors[0];

writeDescriptorSets[1].dstSet = descriptorSets.attachmentRead[i];
writeDescriptorSets[1].descriptorType = VK_DESCRIPTOR_TYPE_INPUT_ATTACHMENT;
writeDescriptorSets[1].descriptorCount = 1;
writeDescriptorSets[1].dstBinding = 1;
writeDescriptorSets[1].pImageInfo = &descriptors[1];

...
vkUpdateDescriptorSets(device, 3, writeDescriptorSets.data(), 0, nullptr);
Pipeline setup
When using multiple subpasses you need to pass the subpass that a certain pipeline is used in at pipeline creation time:
// Pipeline for subpass 0
pipelineCI.subpass = 0;
pipelineCI.layout = pipelineLayouts.attachmentWrite;
vkCreateGraphicsPipelines(...&pipelines.attachmentWrite);

// Pipeline for subpass 1
pipelineCI.subpass = 1;
pipelineCI.layout = pipelineLayouts.attachmentRead;
vkCreateGraphicsPipelines(...&pipelines.attachmentRead);
Rendering
When starting a render pass it always starts with the first subpass, which is of then only one used. But we are using multiple sub passes and as such make use of the vkCmdNextSubpass command to the next subpass within the currently active render pass:
vkBeginCommandBuffer(drawCmdBuffers[i], &cmdBufInfo);

vkCmdBeginRenderPass(drawCmdBuffers[i], &renderPassBeginInfo, VK_SUBPASS_CONTENTS_INLINE);

// First sub pass
vkCmdBindPipeline(drawCmdBuffers[i], VK_PIPELINE_BIND_POINT_GRAPHICS, pipelines.attachmentWrite);
vkCmdBindDescriptorSets(drawCmdBuffers[i], VK_PIPELINE_BIND_POINT_GRAPHICS, pipelineLayouts.attachmentWrite, 0, 1, &descriptorSets.attachmentWrite, 0, NULL);
vkCmdBindVertexBuffers(drawCmdBuffers[i], 0, 1, &scene.vertices.buffer, offsets);
vkCmdBindIndexBuffer(drawCmdBuffers[i], scene.indices.buffer, 0, VK_INDEX_TYPE_UINT32);
vkCmdDrawIndexed(drawCmdBuffers[i], scene.indexCount, 1, 0, 0, 0);

// Second sub pass
vkCmdNextSubpass(drawCmdBuffers[i], VK_SUBPASS_CONTENTS_INLINE);

vkCmdBindPipeline(drawCmdBuffers[i], VK_PIPELINE_BIND_POINT_GRAPHICS, pipelines.attachmentRead);
vkCmdBindDescriptorSets(drawCmdBuffers[i], VK_PIPELINE_BIND_POINT_GRAPHICS, pipelineLayouts.attachmentRead, 0, 1, &descriptorSets.attachmentRead[i], 0, NULL);
vkCmdDraw(drawCmdBuffers[i], 3, 1, 0, 0);

vkCmdEndRenderPass(drawCmdBuffers[i]);

vkEndCommandBuffer(drawCmdBuffers[i]);
This doesn’t look much different than a basic single pass setup. After calling vkCmdNextsubpass, the attachments are transitioned and the information that our write targets from the first subpass will now be used as input attachments is passed to the command buffer state.
The shaders
One thing that hasn’t been discussed yet is how input attachments are actually read from within a fragment shader. For that, Vulkan introduced a new uniform type and syntax to glsl:
layout (input_attachment_index = 0, set = 0, binding = 0) uniform subpassInput inputColor;
layout (input_attachment_index = 1, set = 1, binding = 1) uniform subpassInput inputDepth;
We get a new uniform type called subpassInput and a layout syntax for specifying the index, set and binding of the input attachment. The later two are the same as for all uniforms and must match the descriptors.
The input_attachment_index simply specifies the attachment index as specified at frame buffer creation time.
Reading from an input attachment is then done by using subpassLoad instead of the texture* functions you’d usually use to sample from an image:
if (ubo.attachmentIndex == 0) {
    // Read color from previous color input attachment
    vec3 color = subpassLoad(inputColor).rgb;
    outColor.rgb = brightnessContrast(color, ubo.brightnessContrast[0], ubo.brightnessContrast[1]);
}

if (ubo.attachmentIndex == 1) {
    // Read depth from previous depth input attachment
    float depth = subpassLoad(inputDepth).r;
    outColor.rgb = vec3((depth - ubo.range[0]) * 1.0 / (ubo.range[1] - ubo.range[0]));
}
For details on these new Vulkan glsl types and keywords you can refer to the GL_KHR_vulkan_glsl extension.
Closing words
Input attachments and subpasses are something unique to Vulkan and at first it might not seem clear why these should be used instead of a multi pass approach. But if you’re targeting any kind of tile-based renderer, and yes, even desktop GPUs are at least partially tbrs, they are definitely worth a look. If you’re doing something that doesn’t require you to sample outside of the current pixel location these are the perfect tool for getting better performance out of those tbrs.
Going further
While the basic example detailed in here shows how to use input attachments, the use-case is more artificial than real-world related. If you want to see a more practical use-case for input attachments and subpasses you might want to take a look at my subpasses example.
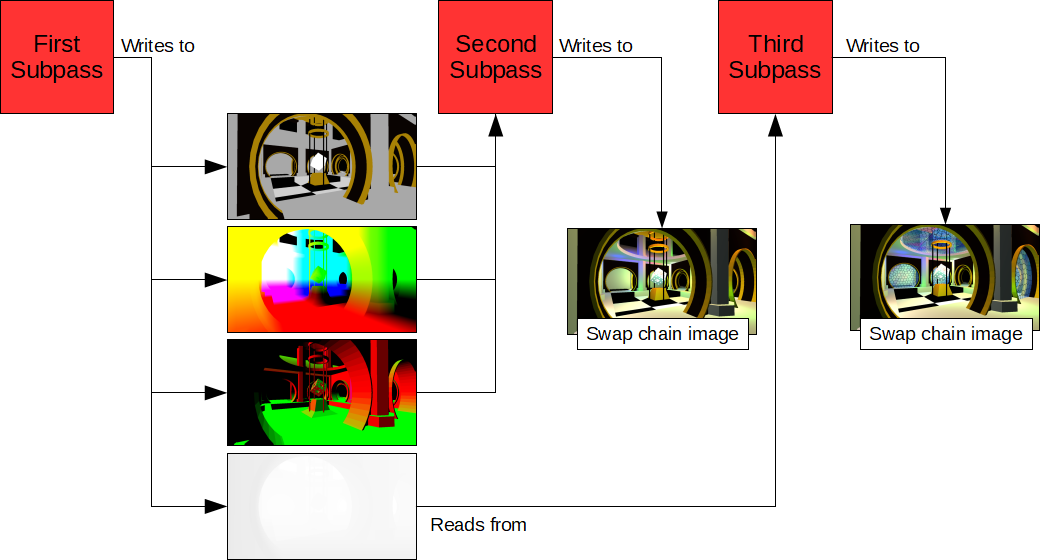
That example uses input attachments and three subpasses for a single pass deferred renderer with forward transparency:

